
Call Us Now:
0345 193 0615
 Alan Winstanley covers the basics of soldering in this first instalment of an article in three parts originally reproduced by Everyday Practical Electronics magazine
© Alan Winstanley 1997-2010
Introduction
The first and most important aspect of assembling any electronic project is undoubtedly that of soldering, which is a delicate and precise skill that is only ever mastered with experience. There is no short cut to acquiring the necessary expertise and it take a certain amount of practise in order to produce a consistently satisfactory solder joint. However, like riding a bicycle, soldering is an art which once learnt is never forgotten, and the purpose of this booklet is to outline the techniques of soldering and desoldering which we hope will set the hobbyist or novice technician firmly on the road to successful electronic assembly in the future.
The principle behind soldering sounds quite simple: the idea is to join components together to form an electrical connection, by using a mixture of lead and tin (solder) which is melted onto the joint using a soldering iron. If you have never picked up a soldering iron before, then this guide will show you everything to help you start soldering with confidence. We also hope that the guidance given will help those involved in other areas of industry — computer technicians, for example, who may be forced to undertake occasional electronic repairs or modifications will benefit from the advice given in this guide.
Before embarking on any form of ambitious electronic project, it is recommended that you practice your soldering technique on some new components using clean strip board (or protoboard) or a printed circuit board, and select a simple and straightforward constructional design as a starting point. Become acquainted and comfortable with your chosen soldering iron, which likely to become as familiar to you as a favourite pen. Learn how to balance it and apply it with precision. Try soldering an assortment of resistors, capacitors, diodes, transistors and integrated circuits.
By achieving success with a modest electronic project, this will be a great confidence booster and more importantly it will introduce you to some of the manual soldering skills which ought to be mastered before proceeding to more ambitious assemblies.
Soldering Irons
Pick up any electronics catalogue and you can be forgiven for being bewildered by the vast array of soldering equipment which is available, which includes irons, controllers, work stations and desoldering equipment too. A large range of soldering irons is readily obtainable – which one is suitable for you depends on your budget and how serious your interest in electronics is, but there is something for every pocket distributed by a variety of retail, industrial and mail-order outlets.
Electronics catalogues often include a selection of well-known brands of soldering iron, including the popular Antex range and also the well-established Adcola and Litesold makes, and Weller is an extremely popular brand used in industry and education. A very basic mains electric soldering iron can cost from under £5 (US$ 8), but expect a reasonable model to be approximately £10-12 (US$ 16 – 20) – though it’s possible to spend into three figures on a soldering iron “station” if you’re really serious about the subject!
The very cheapest irons tend to be less than precise in terms of providing pin-point accuracy for delicate soldering jobs: they can be slightly clumsy and the soldering iron tips (see later) are often imprecisely formed. Check some suppliers’ catalogues for some typical types, though don’t be tempted to over-spend on an elaborate workstation unless you are really very serious about becoming involved in electronics. You will usually obtain perfectly satisfactory results using a fairly modest model, which can help you to decide on the need to upgrade to a more sophisticated version later on should your needs change.
When choosing your soldering iron, certain factors which you need to bear in mind include:
Voltage: for the British market, “mains” irons run directly from the mains at 230V a.c. or will obviously be set for other voltages (110V a.c.) depending on the country. However, low voltage types (e.g. 12V or 24V) generally form part of a “soldering station” and are designed to be used with a special controller made by the same manufacturer (see later).
Wattage: typically, irons for general electronics work may have a power rating of between 15-25 watts or so, which is fine for most electronic assembly tasks. It should be noted that a higher wattage does not mean that the iron runs hotter – it simply means that there is more power in reserve for coping with larger joints. This also depends partly on the design of the “bit” (the tip of the iron). Consider a higher wattage iron simply as being more “unstoppable” when it comes to heavier-duty work, because it won’t be drained of its heat so quickly. This can be very useful when a large variety of soldering tasks may be undertaken, as the higher wattage will assist with producing large solder joints successfully. This brings us to the next consideration:
Temperature Control: the simplest and cheapest types don’t have any form of temperature “regulation”. Simply plug them in and switch them on! Thermal regulation is “designed in” (by physics, not electronics!): sometimes they are described as “thermally balanced” as they have some degree of temperature “matching” – in other words, they warm up as quickly as they lose heat during use, so in a primitive way they maintain roughly a constant temperature. This type of iron is perfectly acceptable for hobby or less demanding professional use. Unregulated irons form an ideal general purpose iron for most users, and they cope reasonably well with printed circuit board soldering and general interwiring. However, most of these “miniature” types of iron will be of little use when attempting to solder large joints (e.g. very large terminals or very thick copper wires) because the components being soldered will draw or “sink” heat away from the tip of the iron, cooling it down too much and preventing solder from flowing properly. This is where a higher wattage may prove more useful.
A proper temperature-controlled iron will be quite a lot more expensive – retailing at say £40 (US$ 60) or more – and will have some form of built-in thermostatic control, to ensure that the temperature of the “bit” (the tip of the iron) is maintained at a fixed level within reasonable limits. This is desirable especially during more frequent use, since it helps to ensure that the temperature does not “overshoot” in between times, and also guarantees that the output will be relatively stable. Some irons have a bimetallic strip thermostat built into the handle which gives an audible “click” in use, and some may include an adjustable screwdriver control within the handle as well.
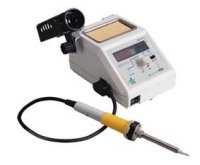
Yet more expensive still, soldering stations cost from £70 (US$ 115) upwards (the iron may be sold separately, so you can pick the type you prefer), and consist of a complete bench-top control unit into which a special low-voltage soldering iron is plugged. Some versions might have a built-in digital temperature readout, and will have a control knob to enable the setting to be varied. The temperature could be boosted for soldering larger joints, for example, or for using higher melting-point solders (e.g. silver solder). These are designed for the most discerning users, or for continuous production line or professional use. The best soldering stations have irons which are well balanced, with comfort-grip handles which remain cool all day, and cables which are burn proof. A thermocouple will be built into the tip or shaft, which monitors temperature.
Anti-static protection: if you’re interested in soldering a lot of static-sensitive parts (e.g. CMOS chips or MOSFET transistors), more advanced and expensive soldering iron stations use static-dissipative materials in their construction to ensure that static does not accumulate on the iron itself, which could otherwise accidentally damage certain electronic components. You will see these irons listed as “ESD safe” (electro-static discharge proof). The cheapest irons are not ESD-safe but never the less will usually perform perfectly well in most hobby or educational applications provided you take the usual anti-static precautions when handling the components. The tip would need to be well earthed (grounded) in these circumstances.
Bits: it’s often useful to have a small selection of manufacturer’s bits (soldering iron tips) available with different diameters or shapes, which can be changed depending on the type of work in hand. You will probably find that you become accustomed to, and work best with, one particular shape of tip for the majority of your work. Usually, tips are iron-coated or nickel-plated to preserve their life and to maintain good tip “hygiene”.
Spare parts: it is always reassuring to know that spare parts are likely to be available in the future if required, so if the element blows, you don’t need to replace the entire iron. This is especially the case with expensive irons. Check through some of the larger mail-order catalogues to see whether spare parts are listed. One drawback is that you may need the services of another soldering iron when exchanging a broken heating element!
You will occasionally see gas-powered soldering irons which use butane propellant rather than mains electricity to operate. They often include a built-in piezo or flint lighter to ignite them, and have a catalytic element which, once warmed up, will continue to glow hot when gas passes over them. Field service engineers use gas-powered irons for working on repairs where there may be no power available, or where a joint is tricky to reach with a normal iron, so they are really for occasional “on the spot” use for quick repairs, rather than for mainstream construction or assembly work. Other gas-powered irons are nothing more than miniaturised blowtorches, which may or may not be useful for occasional heavier duty soldering but in the author’s experience they can be difficult to use in confined areas.
A solder gun is a pistol-shaped iron, typically running at 100W or more, and is completely unsuitable for soldering modern electronic components: they’re too hot, heavy and unwieldy for micro-electronics use (nor are they designed for that). Plumbing, maybe..!
Soldering irons are best used along with a heat-resistant bench-type holder, so that the hot iron can be safely parked in between use. It is extremely important that a hot soldering iron is always safely “parked” ready for action, and a bench stand is really a necessity. Soldering stations already have such a feature, otherwise a separate soldering iron stand is essential, ideally one with a location for holding a damp tip-cleaning sponge. Considering making a home-made holder from a length of copper pipe screwed firmly to a wooden base.
Other equipment which may be worth considering include the use of fume extractors, which are compulsory in the industrial workplace. A basic fume extractor consists of a small bench-top fan which draw fumes and smoke away from the operator’s face and filters out the more noxious elements, before expelling the remaining air back to atmosphere through the fan vent. The carbon-impregnated foam filters are replaceable. Such devices are extremely effective and users soon find them indispensable, but they can be somewhat noisy at close range.
Professional fume extraction systems draw the pungent fumes directly from the work area via a clip-on tube fitted to the soldering iron, then vent the fumes away through a large filter pump. Such systems are for production use, though it is definitely worth considering purchasing a small bench top unit for regular hobby or occasional professional use.
A variety of hand tools are available to assist with preparation before and during soldering, and a good supplier’s catalogue will offer a range of small brushes, scrapers and cleaning tools in a handy kit, together with the usual types of wire cutters, pliers and so forth, which are necessary for manipulating components and tidying up as required.
Now let’s look at how to use soldering irons properly, and later on we will describe the techniques for putting things right when a joint somehow goes wrong — and don’t worry, even the experts get it wrong sometimes!
The on-line version of the Basic Soldering Guide (with colour photo gallery) can be accessed at http://www.epemag.wimborne.co.uk/solderfaq.htm
Other useful web sites:
Text and Photographs © Copyright © Alan Winstanley 1997-2010 The author can be contacted by E-mail:alan@epemag.demon.co.uk
Leads Direct makes great efforts to provide accurate and complete information. However, portions of the information contained in this website and any documents viewed on it or downloaded from it may be incorrect or not current. Any errors or omissions should be reported for investigation and correction. The information provided in any documents whether on our website or otherwise is provided "as is." No warranty of any kind, implied, expressed, or statutory, including but not limited to the warranties of non-infringement of third party rights, title, merchantability, fitness for a particular purpose, and freedom from computer virus, is given.